Notice!
Update 2014.08.16:I no longer use this plugin, so what you see down below is what is left after you disable it. However, the plugin is still supported (it was last updated in 2013), so I’ll keep this post here for reference.
It’s a handy plugin, so I may use it again in the future.
WordPress makes it very easy to link to other web pages, especially pages within your own blog. One thing it doesn’t do at all, however, is include text or images from the sites you link to. One site that does this fairly well is Facebook, which allows you to choose which images and text you would like to include from the site you are linking to. I’m not completely happy with how Facebook does this (but to be fair, I’m not completely happy about how Facebook does anything these days), but I found a plugin—WP Lynx—that does pretty much the same thing for WordPress, and I’m very happy with it. Look at the following examples:
Here is something that is seriously cool:

And here is something else:
WP Lynx accomplishes this by scraping the URL you are linking to, looking for images and text that it can then copy to your blog post.
Contents
Installing WP Lynx
You can install WP Lynx from within the plugin pane of your WP dashboard, or you can download it from the WordPress plugin repository. Activate it, and then go to the settings pane of your WP dashboard and click on WP Lynx.
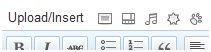
Once it’s installed and you have selected the appropriate settings, the plugin adds a new icon that looks like a paw to the right of all your other “Upload/Insert” icons:
But you’re not ready to start scraping sites yet. You have to choose some settings first.
WP Lynx Settings
There are four tabs in the WP Lynx settings pane: General, Images, Text, and Advanced. You have to set the settings before WP Lynx will work! I assumed that this plugin didn’t have any settings and was disappointed when it didn’t work and was on the verge of deleting it before I checked.
General Settings
- Shorten URL—will shorten the URL of your links. (I have not figured out how this works.)
- Default Style—loads the default WP Lynx styles. I will talk about how to override this in a bit.
- Maximum Image Width—is the maximum width of images that will be displayed. Keep in mind that this will always be a maximum of 20% of the Lynx display, so don’t go crazy here.
- Maximum Image Height—is the maximum height of images that will be displayed.
- Crop Image—crops images in the cache to the above dimensions.
- Cached Image Format—determines the format that images will be saved in: either the source format, PNG, JPG, or GIF.
- Cached Image Quality—determines the quality setting if you selected JPG as the cached image format.
Images
The settings in this tab determine the minimum size and maximum number of images that will be scraped from the site you link to. The default for size is 70pixels, which helps to avoid scraping icons.
Text
- Minimum Paragraph Length—is the minimum length (in characters) of paragraphs that will be scraped. This helps to avoid scraping headlines. If you would like to scrape headlines, set this to zero.
- Maximum Paragraph Length—is the maximum paragraph length (in characters) that gets scraped. You can select a long length and then edit it in the WP Lynx dialog box.
- Minimum Paragraph Count—is the minimum number of paragraphs that WP Lynx will scrape. Five is the default, but you can set it higher if you would like even more choice about what to quote, or if sidebars on the left side are showing up before the content.
Advanced
The “Lynx Print Template” print template is what we are really interested in here, because this is what determines how your links are displayed on your blog. The default coding is:
<div>%image%<div><a title="Go to %title%" href="%url%">%title%</a><small>
%url%</small><span>%description%</span></div></div>
because I like external links to open in a new window or tab, I added “target=”_blank” in the anchor tag, so my print template now looks like this:
<div>%image%<div><a title="Go to %title%" target="_blank" href="%url%">
%title%</a><small>%url%</small><span>%description%</span></div></div>
You can, of course, add other elements here, such as inline styling, but there is an easier way to style your links.
Matching WP Lynx’s Default Style to Your Blog’s Style
In the “General Settings” tab, there is an option to enable the default WP Lynx style. This default style is easy on the eyes and straightforward, but I wanted to match my links style to my blog child theme. This is how I did it.
First, I deselected the “Default Style” option and then saved the settings. I then copied the default WP Lynx styles and pasted them to my child theme’s stylesheet. The default settings are:
.llynx_print{margin:10px;padding:5px;display:block;float:left;
    border:1px solid #999;}
.llynx_print img{padding:5px;border:none;max-width:20%;float:left;}
.llynx_text{float:right;width:70%;}
.llynx_text a{text-decoration:none;font-weight:bolder;font-size:1em;
    float:left;width:100%;}
.llynx_text small{padding:3px 0;float:left;width:100%;}
.llynx_text span{float:left;width:100%;}
The only thing I really changed was the border around the entire link area. That first line above now looks like this:
.llynx_print{
 margin:10px 30px 10px 30px;
 padding:0 5px 10px 5px;
 display:block;
 float:left;
 border:3px double #2172b8;
 -moz-border-radius-bottomleft: 12px;
 -webkit-border-bottom-left-radius: 12px;
 border-bottom-left-radius: 12px;
 -moz-border-radius-topright: 12px;
 -webkit-border-top-right-radius: 12px;
 border-top-right-radius: 12px;
 -moz-border-radius-topleft: 12px;
 -webkit-border-top-left-radius: 12px;
 border-bottom-left-radius: 12px;
 -moz-border-radius-bottomright: 12px;
 -webkit-border-bottom-right-radius: 12px;
 border-bottom-right-radius: 12px;
 }
Using WP Lynx
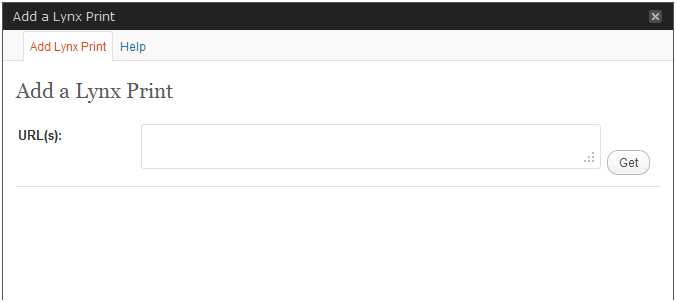
When you are ready to include a link, click on the paw print I mentioned above. A box will pop up that looks like this:
Enter a URL and click on the “Get” Button. You then get something that looks like this:
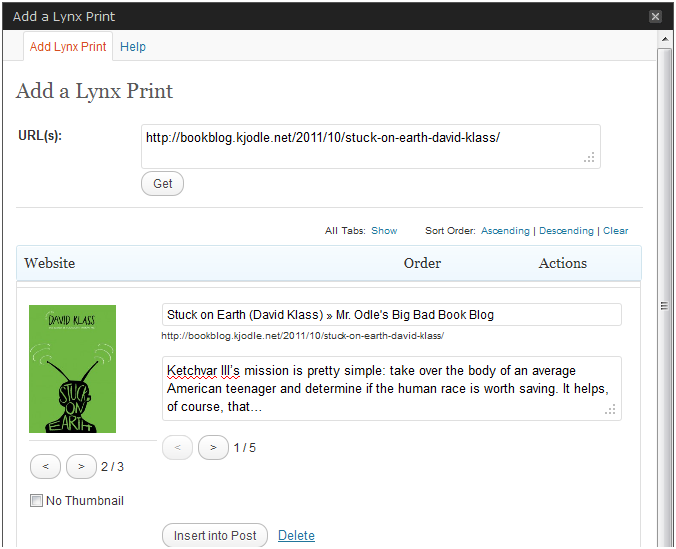
If you use Facebook, that dialog box needs no further explanation. In short, you can choose which image to display (or even none, by clicking on “No Thumbnail”), and you can edit both the link text and the description. When you are finished, just click on “Insert into Post”. This is the result:

And yes, that is a good book. Read it.
A Weird Quirk
One odd things I have noticed about this plugin is that it has trouble getting out of the <div> is uses to enclose a link, which is a real problem in the Visual Editor. The easiest way around this that I’ve found is to type the paragraph above where the link is to go, hit “Enter” twice, leaving a blank space, and then starting the next paragraph. Then, go up to that blank line and insert the link.
This is kind of annoying, frankly, but I’m willing to do it because this is such a fantastic plugin. Incidentally, there’s nothing about in the plugin documentation. Keep in mind that the version of the plugin I’m using is only 0.3.0, so it may be fixed in a future update.
https://techblog.kjodle.net/2011/11/06/wp-lynx-plugin-for-wordpress-that-provides-fb-style-links/

The settings have to be set otherwise things don’t work thing should be fixed in the next release (0.4.0). As for the spacing/escaping the div issue (more of a issue with TinyMCE), I noticed this while working on the next version. I’m trying to find a good solution to this for the next release. One important thing to note, in the mean time, is that using a newline (pressing enter) in the Lynx Print Template will cause things to break when attempting to insert a Lynx Print.
Thanks for keeping us up to date. Definitely looking forward to the next release.