Important!
Four years ago, I wrote a tutorial about using custom menus in WordPress. Things have moved on in WordPress, so rather than update the old post, I decided to rewrite it.In many themes, a “default menu” of your pages will show up somewhere around the top of your website. Depending on the menu’s functions, you may or may not have any control over how these pages appear and parent pages may not show child pages as a drop-down.
A custom menu is just that: a menu that allows you to include any combination of the following:
- Custom links
- Categories
- Posts
- Pages
- Post Tags
There are four general steps to using a Custom Menu:
- Create it
- Add items to it
- Arrange the items however you like
- Put it someplace
To make things more clear, I’ve used screen shots from this from the TwentyFifteen theme to demonstrate the steps involved.
Contents
To Create a Custom Menu:
- In the Dashboard, click on “Appearance” and then click on “Menus”
- On the right-hand side, There is an input box for the menu name. Enter a name and click the “Create Menu” button. (Don’t worry if you can’t think of a good one. You can always change it later.)
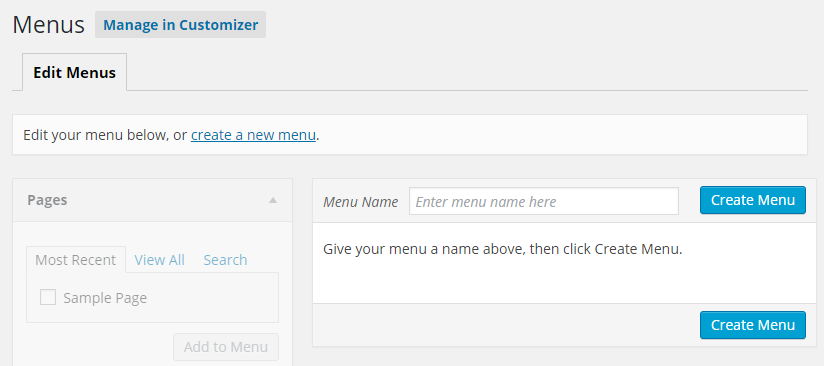
That’s it! You’ve now created your first custom menu. Of course, it doesn’t contain any items. We’ll do that next.
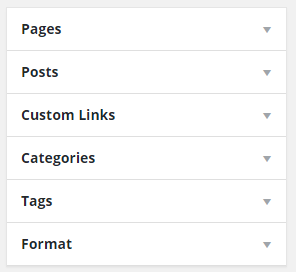
Add Items to a Custom Menu
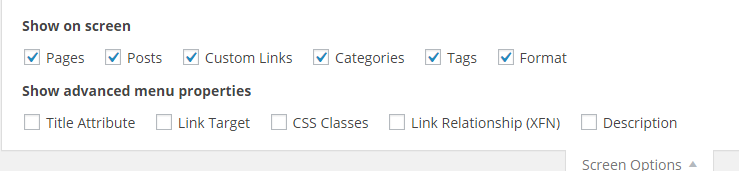
On the left-hand side of the Custom Menu area, you should see a series of boxes that look like this:
If you don’t, click on the “Screen Options” button in the upper right-hand corner:
![]()
Now, go back to the first set of boxes mentioned in this section. These are where we will add items to our custom menu.
Adding Pages and Posts
The first option allows us to add pages to our custom menu. In general, it is open by default, although I closed it by clicking on the triangle in the above screenshot.
Additionally, “Pages” and “Posts” both default to showing the most recently published items:
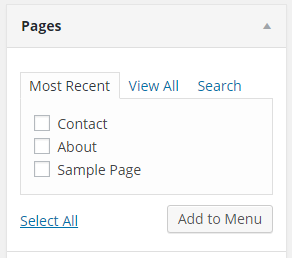
If you don’t see the item that you want to add, click on “View All”. (If you have a lot of pages and/or posts, you can also click on “Search” to find one in particular.)
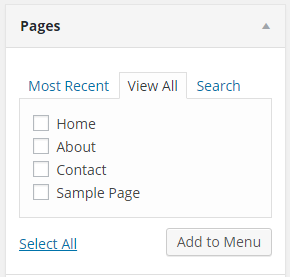
Tick the boxes of the pages you want to include:
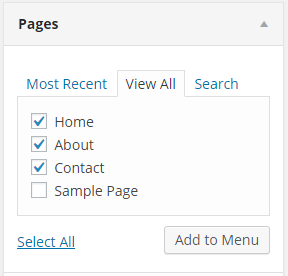
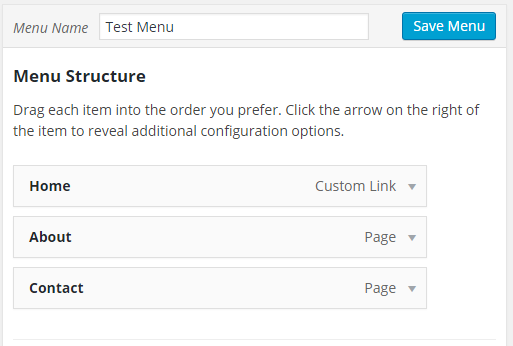
and click the “Add to Menu” button. After a moment, you should see these items listed in your menu to the right:
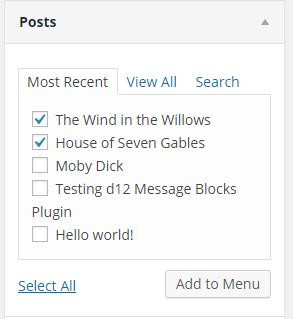
Use the same exact procedure for adding posts to your custom menu:
Our menu now looks like this:
Adding Custom Links
If you need to add a link to a particular page on your blog that isn’t actually a page (such as the home page), or to a page outside your blog, you can use the “Custom Link” option to do just that:
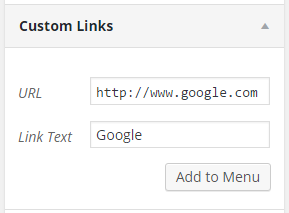
After you’ve specified the URL (don’t forget the “http://” part) and the Link Text (which is what readers will see in the custom menu), click on the “Add to Menu” button.
Note: You can add as many custom links as you want, but unlike Pages and Posts, you need to add them one at a time.
Adding Category and Tag Archives
WordPress does a neat thing: when you create a category or tag, it also creates an archive page that lists all the posts that are contained within that category (in the case of categories) or that contain that tag (in the case of tags). You can add a link to those category and tag archives in a custom menu:
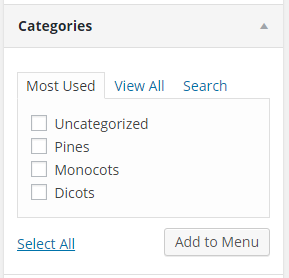
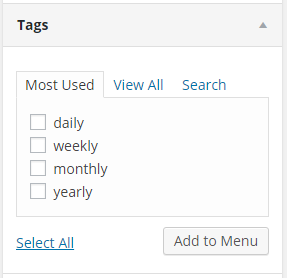
Similar to the options for posts and pages, the categories and tags option default to “Most Used”. You can click on “View All” to see all the categories or tags, or click on “Search” to find a particular one.
Again, once you finish, click on “Add to Menu”.
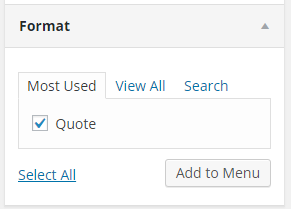
Adding Post Formats
The last item in the box on the left is “Format”. WordPress supports nine different post formats by default:
Not all themes support all these posts formats, however. If your theme does, and you use them, you can use this option to link to an archive of the posts that have that particular format.
As an example, I created a single post with a “Quote” post format:
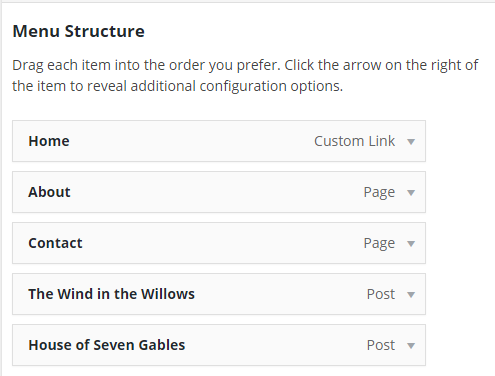
Arranging Items in a Custom Menu
Once we’ve done all the above steps, whatever items we’ve added will now appear on the right side of our Custom Menu screen, in the order we’ve added them. Here’s a snapshot of the menu I’ve been creating as an example:
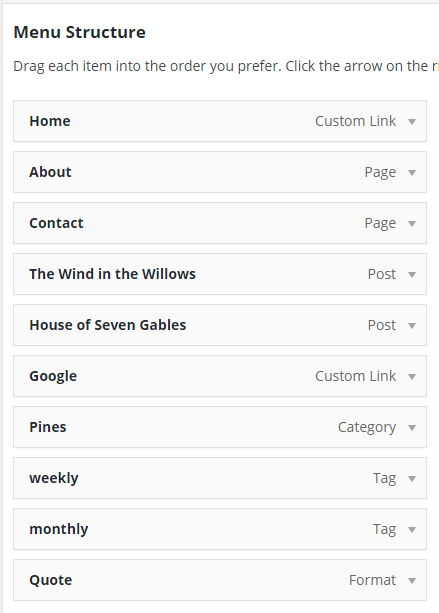
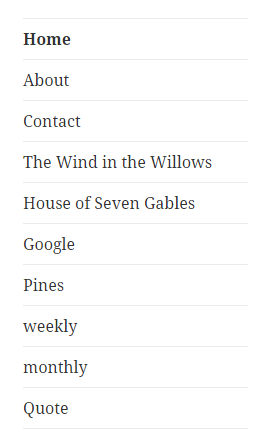
Each grey box that represents a custom menu item that you can drag up and down to change the order in which they appear in your custom menu. If your theme supports a drop-down custom menu, these items will all appear in a single drop down item, or as a simple list if your theme doesn’t support a drop-down custom menu:
However, you may find it useful to make your menu more compact by making some items children (or even grandchildren) of other items. You can achieve this by draggin individual items to the right. I’ve done that here:
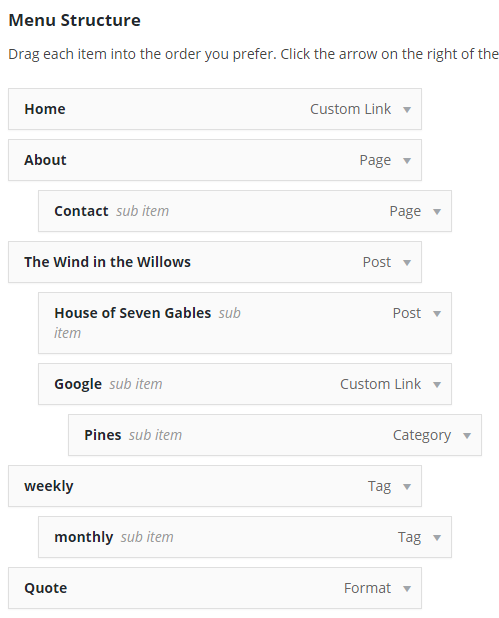
You can see that “Contact” is now a child of “About”, “House of Seven Gables” is a child of “The Wind in the Willows”, and that “Pines” is a child of “Google” and a grandchild of “The Wind in the Willows”. It looks like this on the website:
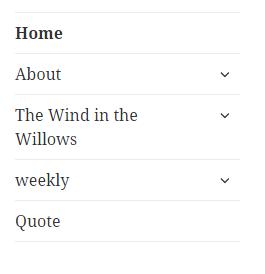
The upside down carets at the right of a menu item indicates that clicking on that caret will reveal additional items. (Again, this is in the TwentyFifteen theme. Different themes will display child and grandchild items differently.)
Putting Your Custom Menu Someplace
I said earlier that you can only use a custom menu if your theme supports it. The good news is that most modern WordPress themes do support custom menus. How many they support and where they place theme vary quite widely from theme to theme, however.
At the bottom of your custom menu, you’ll see something like this:
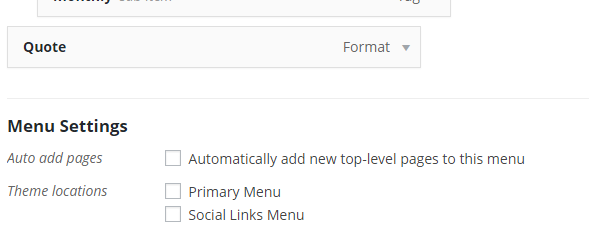
The “Theme locations” option tell you where your theme supports a custom menu. In this case, the TwentyFifteen theme supports two custom menus. Click the “Primary Menu” option and then the “Save Menu” option to have TwentyFifteen display your custom menu as its primary menu on the left side.
Managing Locations
Many themes support three or more custom menu locations. Additionally, you can have as many custom menus as you want, although you can’t necessarily use them all at once. You may find it useful, for example, to create many custom menus while designing your site, and then play around with where to put them. To do this, click on the “Manage Locations” tab:
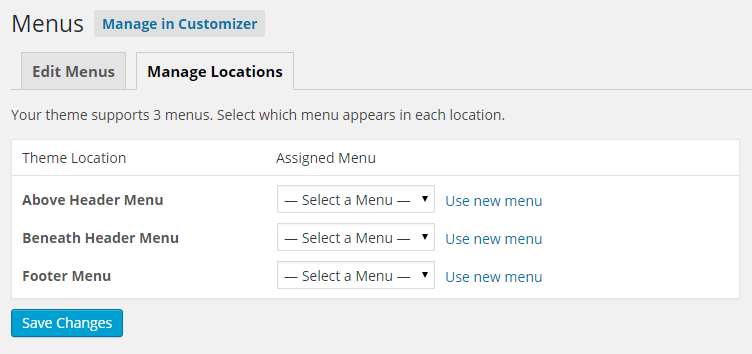
This feature lists every location that your theme supports a custom menu. (I’ve switched themes to give you a better idea of this, since TwentyFifteen only supports two custom menu areas.) You can assign a menu to each location from the dropdown:

or click “Use new menu” to create a new custom menu. (Be sure to click on the “Save Changes” button when you’re finished.)
Where Else Can You Use a Custom Menu?
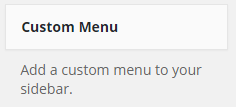
You can also use a custom menu in any widgetized area (which are, typically, sidebars). Navigate to the “Widgets” pane and you’ll see this:
Click on it, and it will reveal a drop-down with all the areas in your theme that you can add a widget:
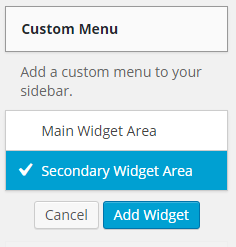
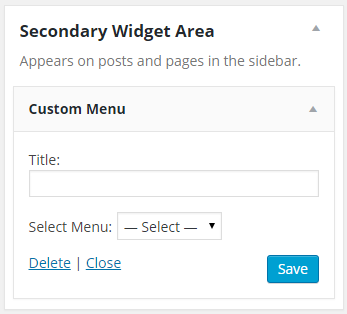
Select the area you’d like a custom menu to appear (I’ve chosen the “Secondary Widget Area”) and click the “Add Widget” button. You can now select which custom menu you want to appear in this area, and even give it a custom title:
This is especially useful if there is a group of posts or pages that you want to highlight.
Creating a Menu Item That Isn’t a Link
A common issue with custom menus is how to create a menu element that isn’t linked to anything. I’ve actually written about that here.
Using the Theme Customizer
For better or for worse, the powers that be at WordPress have decided that most customization options should be handled through the Theme Customizer. (There has been much gnashing of teeth over this decision, but I’m starting to think it’s a good one—unless you have a small monitor.) In fact, if you look at the first image in this post, you’ll notice an option to “Manage in Customizer”.
For the time being, Custom Menus in the Theme Customizer work pretty much the way I’ve outlined above. You can perform all the functions I’ve outlined above, but instead, you can see your results live. It’s pretty nifty actually, and reduces the learning curve for WordPress quite a bit.
Conclusion
Custom menus are a powerful tool for customizing your WordPress site. If your theme doesn’t support custom menus, it’s time to find one that does. And once you have a theme that supports custom menus, be sure to use them.
Questions? Thoughts? Feel free to comment below.
https://techblog.kjodle.net/2016/01/12/create-custom-menus-in-wordpress-redux/

This was so helpful! Thanks so much!!
Wow, you really saved my day (and probably my relationships :P) Thank you for rewriting this guide!!!!
I do have a question though; do you know if it is possible to make the pages ‘un-clickable’?
I would like to just use them as headlines for my posts (that have been given various categories), so instead of clicking on the menu tabs on my website, the only option for the reader to click is the drop downs 🙂
Thanks in advance.
Yep—just use a custom link to create a null link. Here’s the tutorial I wrote about that: https://techblog.kjodle.net/2012/06/18/create-a-null-link-in-a-custom-menu/
I think I should include a link to that in this tutorial. It’s something a lot of people want to do. (I’m kind of surprised WordPress doesn’t include this function, to be honest.)
Racking my brain on this one …thanks for the heads-up on sub-menus. I can’t believe it was so easy. How to vertically align the new sub items?
Do you mean on the front end of your site?
If so, they are vertically aligned via CSS. Unfortunately, I can’t provide much help here, as each theme styles menus differently. Try using your browser’s “Inspect” function (F12 or right-click on an item, usually) to see which CSS classes and/or ID’s are affecting the menu item spacing.
If I want to change my menu can I create a new menu based on the old menu but not make it “live” unitl I have it right?
Yes. You can have a lot of different custom menus, but only those that are assigned to a location will be seen.
I have a problem with menu settings. I have dragged subitems to the main items. but when publish my site the sub menu items do not hide and it also desplays with main item. so how can I hide them and when hover over the main item then only display the sub menu item
It may be that the theme you are using does not support this kind of menu. Try temporarily switching to a different theme to see how they are displayed. If they display correctly with the new theme, it’s a theme issue. If they do not display, it may be an issue with your WordPress install (usually a plugin issue), or a JavaScript issue.
Thank you very much, you are a lifesaver. I can’t believe that it’s so simply, yet I’ve lost so many hours of sleep trying to figure it out!
Glad to have helped! 🙂
How do create megamenu custom?
Thanks all
Megamenus are not part of WordPress core. For that, you’ll need a megamenu plugin: https://wordpress.org/plugins/search.php?q=megamenu
Thank you so much. After an hour of trying to figure it out on my own your tutorial gave me the info I needed in a couple of minutes.
You’re welcome. I’m glad it saved you some time.
Thank you SO much for this post! It was so easy to follow and straightforward.
You’re welcome. I’m glad you found it easy to follow.
Thanks for a very complete tutorial.
I created a custom menu item in which I want to function as a label only, so I deleted the URL from that item, but it still shows a different color on mouse-over as if it was a link. How do I disable that hover effect from that item?
You can see it here: http://sg.terrybraunstein.com/events-news/ and the item is the ‘Written About Braunstein’s:’ in the menu below the logo.
There is a style for the
:hoverpseudoclass on your menu items. This is normally easy to override, but you are using a plugin for that menu that makes it difficult to override. (I’m not sure why you are using it; a simple menu like that shouldn’t need a plugin.)before I start adding a menu according to your clear instructions I’d like to ask you: how can I change a Custom Menu if I do not like it (I cannot view it in the process of making the customs menu can I?)
When creating a custom link to a PDF, how do you indicate that it should open in a new window?
The target is an option in general but not with custom links as far as I can tell.
That’s a really good question! There’s no way to do that in the default custom menu options. It’s possible that there is a plugin that will handle that function, but I’m not aware of one. If I find one, I’ll definitely post a link.
I have a nested menu but following the structure – I wanted drop downs after the first level and then button to open a map page within the site rather than externally. The first level .. no problems but when I added the next level they all appeared on the first level structure whereas I had all father and grand-fathered them… Do you know how to link from a button to a new page
I’m not quite sure what you’re after here. Do you mean you want a button in a menu?
Is there a web site somewhere that has the kind of function you’re looking for that you can point me to as an example?
Sorry it took me a while to reply; work and health issues.
how can i remove dropdown menu and freez its submenu?
I’m not sure what you’re asking here. What do you mean “remove dropdown menu” and “freeze its submenu”? You can delete menu items, or you can promote them. But dropdown functions are controlled by the JavaScript settings in your theme.
I’m trying to apply this to a page that is not the home page, but can’t figure it out. My new menu shows up when I click on navigation but on the HOME page. My theme allows two menus.
Try clearing your browser cache.
Sorry for the delay in getting back to you; my email has been dodgy lately. Have you managed to get this sorted?