I am constantly recommending that people who are trying to tweak various elements on their WordPress blog use Firebug,* which will allow them to easily see the exactly the element in the code they are trying to change. Because I see a lot of questions about how to use it (as well as reluctance to install and use yet another program), the time has come for a quick tutorial. There is extensive documentation available at the Firebug website, so this is not meant to be a comprehensive tutorial at all. It’s just meant to help you get your feet wet.
Contents
First Steps
First, Firebug only works with the Firefox browser from Mozilla. Firefox is the best browser available, so if you aren’t using it, you are missing out. Go get it now!
Second, install Firebug. You can do this by downloading if from the Firebug website, getfirebug.com or by installing it from within Firefox by going to the Add-ons menu and clicking on “Get Add-ons.” Search for Firebug and then follow the prompts to install it. (You will need to restart Firefox.) Once it’s installed, surf over to your blog.
A Basic Example
Hover your mouse over any part of your blog that you are curious about, and then right-click. (As an example, I’m using this page from my blog, and right-clicking on the page navigation link labeled “…we cannot live only for ourselves… “.) A contextual menu will pop up that looks something like this:
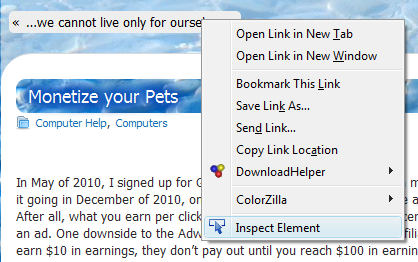
The last item in the menu, “Inspect Element,” is the one we’re interested in. Left-click on it, and this will happen to the bottom of your screen:
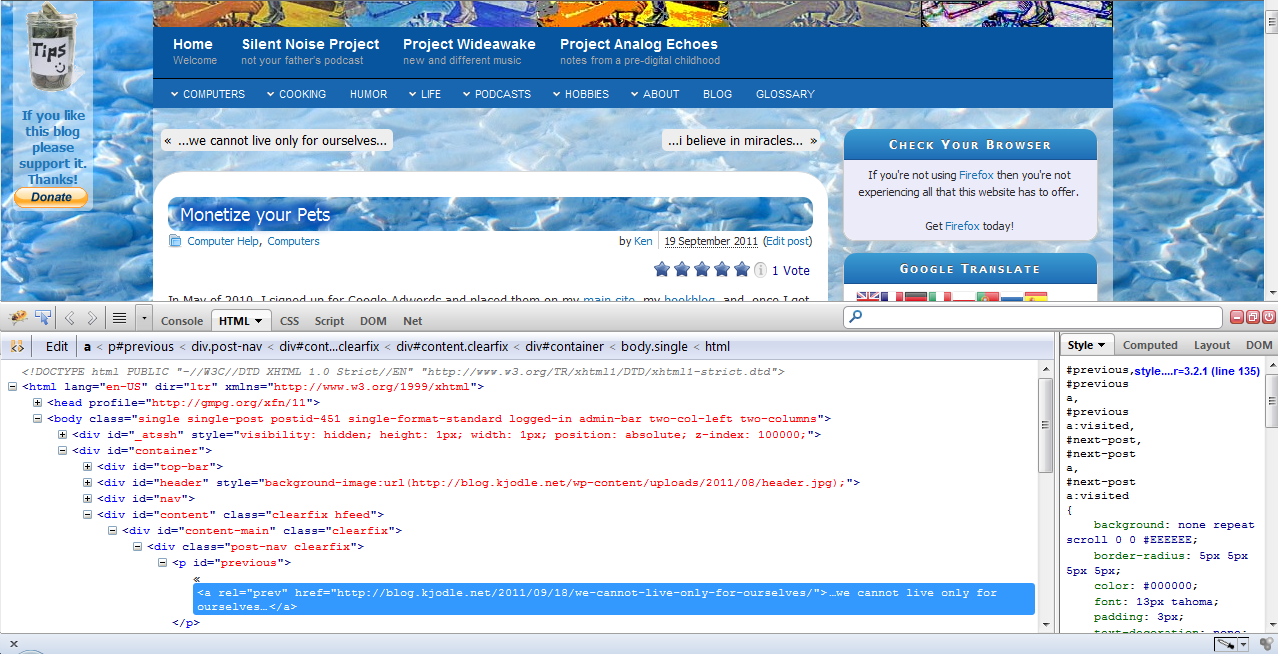
This is like using the “View Source”* function of your browser in real time. Let’s take a closer look at what Firebug is telling us about the element we’re looking at:
The section highlighted in blue is the actual link. What Firebug is showing us is that this link is contained in a paragraph, labeled `<p id=”previous”>`. Furthermore, that paragraph is contained within a `div` labeled `<div class=”post-nav clearfix”>`. If that doesn’t mean anything to you, then you need to learn a little HTML and CSS, and a whole new world will be revealed to you. If it does mean something to you, however, you now have the tools you need to completely modify your blog’s (or website’s) appearance.
Using Firebug to Explore Your Site’s Structure
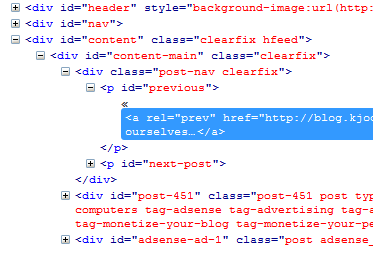
Part of what makes Firebug so useful is that it works both ways. Above, we selected an element and inspected it. However, you can also scroll around in Firebug, using those collapsing menu boxes, and hover over an item, which will then be highlighted in the window above it. This is hard to describe, so here’s a snapshot:

I hovered over the `<p id=”previous”>` in the Firebug window and it highlighted that element in the screen above. If you are new to blogging, coding, or tweaking, this may not seem all that useful, but it helps you figure out what certain types of code are actually generating. In fact, if you collapse the Firebug display back far enough, you can see the general structure of this blog, which is provided by the Graphene theme:

Very useful stuff. You can see that my blog is divided into five basic sections, all contained within their own unique `<div>`. Hovering over those items in the Firebug window will highlight them in the main window, helping you to figure out what is what. So if you want to start doing things that the theme options don’t provide for, such as changing the width of parts of the blog, you now have an idea of what elements you need to look for in the theme’s stylesheet that might need to be tweaked.
A Caveat about CSS
As useful as the information that Firebug provides is, it still doesn’t give you everything you need. You really need to do a bit more digging.
In the example above, for instance, I might assume that the appearance of the page navigation paragraph is controlled solely by the css id `#previous` and then start doing things like this:
#previous {
    font-size:really big, but not too big;
    font-color: bright red, like my dad's new car;
}
Okay, I know that’s not really good code. 😉 The point is that there are some other bits of code that also serve to control the appearance of this element. If I poke around a bit in Graphene‘s stylesheet, I find this:
#previous,
#previous a,
#previous a:visited,
#next-post,
#next-post a,
#next-post a:visited {
   color: #929292;
   font: 12px tahoma;
   text-decoration: none;
}
That’s the code I need to fully control the appearance of this element. Without that, my links would look the way I want them to only some of the time. Firebug doesn’t tell you what you need to change, but it does tell you what you need to look for in your stylesheet. It’s a compass, not a road map.
Other Browsers
I favor Firefox because it is the most standards compliant browser available. (I’m a Macintosh fanatic, but even Safari acts weird a lot of the time.) However, other browsers do have similar features available:
- Google’s Chrome has an “Inspect Element” feature built in.
- Firebug Lite is available for Safari here.
- If you are one of the other three people besides myself who uses SeaMonkey, there is an addon called “InspectorWidget” which is available here. (It’s very different from Firebug, however.)
- I don’t know about Opera, as I don’t use it often enough.
- Don’t even ask about Internet Explorer. Seriously.
*What About “View Source”?
I used to recommend that anyone who wanted to learn about a website just use their browser’s “View Source” function. I still do. However, you still need to know a little bit about (or a lot) about HTML, CSS, and many times, JavaScript, to use this approach. Because of technologies like PHP and ASP, you won’t actually see the code used to generate the HTML, which can sometimes make it difficult to figure out what’s going on. But it’s still a useful technique.
The biggest problem with this approach, though, is that some pages are just massive, and you need to do a lot of scrolling to find what you are looking for. It helps if there is a unique bit of text on the page that you can use your browser’s “Find” function to look for in the source code.
That’s it. Feel free to comment. I know I haven’t answered everybody’s questions about this subject in this brief post, so ask any questions down below in the comments and I can add them to the post. Thanks!
Other Helps
Josh Lobe has a good video tutorial available here. It’s a hair under 11 minutes long, so it probably will take you less time to watch the video than it will to read this post. He gets into a lot more detail about using Firebug to preview changes to your site’s CSS, so I highly recommend it. I learned a lot from it and I guarantee you will, too.
https://techblog.kjodle.net/2011/10/02/using-firebug-to-tweak-your-blog/
