Update Information:
Update (January 12, 2016): WordPress has changed how they handle custom menus quite a bit. Rather than edit this article heavily, I decided to just write a new one, which you can view here. Comments on this article are now closed.In order to talk about a custom menu, we should first talk about what a “default menu” is. In many themes, a “default menu” of your pages will show up somewhere around the top of each page or post. Depending on the menu’s functions, you may or may not have any control over how these pages appear and parent pages may not show child pages as a drop-down.
A custom menu is just that: a menu you create. You can include any combination of the following:
- Custom links
- Categories
- Posts
- Pages
- Post Tags
There are four general steps to using a Custom Menu:
- Create it
- Add items to it
- Arrange the items however you like
- Put it someplace
To make things more clear, I’ve used screen shots from this blog, which uses the Graphene theme, to demonstrate the steps involved.
Contents
To Create a Custom Menu:
- In the Dashboard, click on “Appearance” and then click on “Menus”
- On the right-hand side, notice a plus sign (+) just above where it says “Menu Name”. In the box to the right, which says “Enter menu name here,” enter a descriptive name for this menu. (Don’t worry if you can’t think of a good one. You can always change it later.)
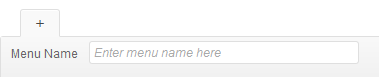
- Click on the “Create Menu” button to the far right.

That’s it! You’ve now created your first custom menu. Of course, it doesn’t contain any items. We’ll do that next.
Add Items to a Custom Menu
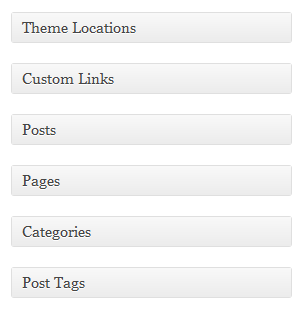
On the left-hand side of the Custom Menu area, you should see a series of boxes that look like this:
If you don’t, click on the “Screen Options” button in the upper right-hand corner:
and tick all the boxes that appear there, so it looks like this:
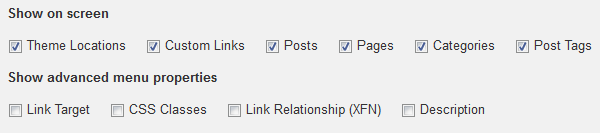
Now, go back to the first set of boxes mentioned in this section. Let’s ignore the one that says “Theme Locations” because this will only show up if your theme supports custom menus in the first place. (We’ll say more about that in a bit.) It’s the option boxes down below that we are interested in.
Adding Custom Links
The first one, “Custom Links”, is just that. Using this option, you can add a custom link to anywhere on the web. You could even create a link to my blog, which you are certainly welcome to do:

After I’ve specified the URL (don’t forget the “http://” part) and the Label (which is what readers will see in the custom menu), I’ll click on the “Add to Menu” button.
Adding Categories
“Categories” will allow you to create links to posts that are listed under certain categories. When you click on this, you will get a “Category Archive” page listing all* the posts in that category.
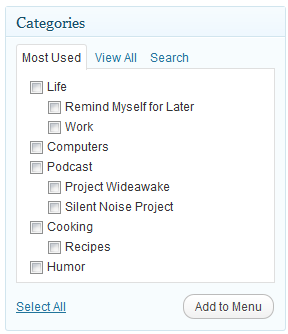
I can make my choice from the “Most Used” categories, or I can “View All” and scroll through the list, or I can click on “Search” to find a particular category. Once I’m finished, I’ll click the “Add to Menu” button.
Adding Posts
“Posts” will allow you to create links to specific posts. If I click on this in my blog today, I get this listing:
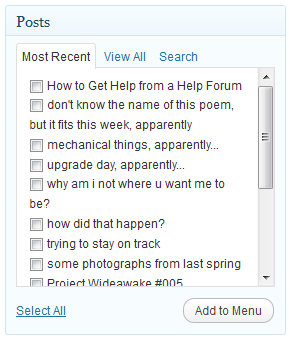
As you can tell, it shows the most recent posts. I can tick the boxes of the ones that I want, or I can click on “View All” to show all of my posts, or click on “Search” to search for a specific post. Or I can just click on “Select All” to add all the posts that are visible there. Once I’ve made my selections, I’ll just click on the “Add to Menu” button to add the items to my custom menu.
Adding Pages
“Pages” will allow you to create links to specific pages. Clicking on this box brings up a box very similar to the “Posts” box:
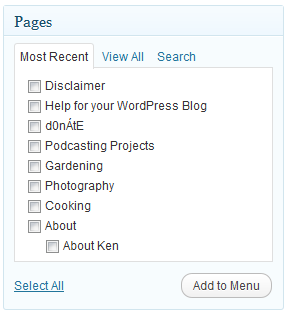
Again, I can choose from among the most recent pages, or view them all, or search for a particular one. Once I’ve ticked the boxes of my selections, I’ll click the “Add to Menu” button.
Adding Tag Archives
“Post Tags” is a similar to the “Categories” box above. It will allow you to create links to posts containing specific tags. When you click on this in a custom menu, you will get a “Tag Archive” page listing all* the posts that contain that tag.
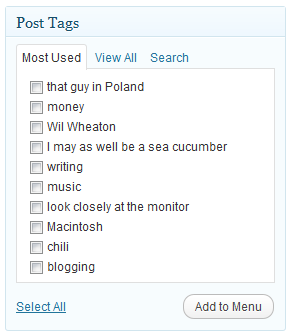
Again, once I’ve made my selections, I’ll click the “Add to Menu” button.
Arranging Items in a Custom Menu
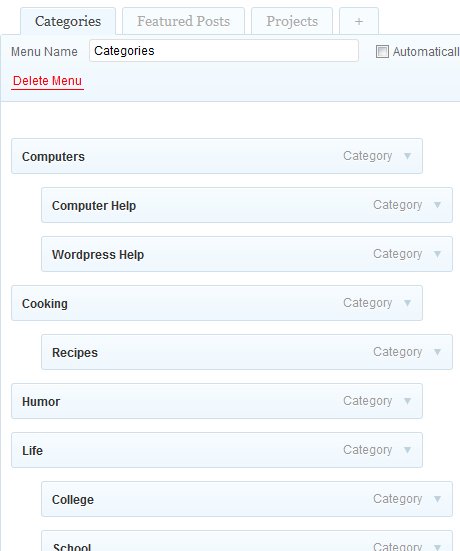
Once we’ve done all the above steps, whatever items we’ve added will now appear on the right side of our Custom Menu screen, in the order we’ve added them. Here’s a snapshot of my custom menu called “Categories”:
If you’ve been following along on your own blog, adding things as we’ve gone through this tutorial, you’ll realize that your custom menu doesn’t look like mine, because all of your items are lined up to the left.
This is where the fun really begins. You see each light blue box that represents a custom menu item? You can move it. That’s right, just grab it with your mouse and move it around in the custom menu area.
If you move items up and down, you change the order in which they appear in your custom menu.
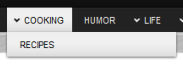
If you move things right to left, you can make children and grandchildren out of items which get moved to the right. For example, if you look up above, you’ll see that “Recipes” is both under and a little to the right of “Cooking”. If you look at how this shows up on my blog, it looks like this:
Again, you’ll only get this kind of effect if the theme you are using supports it.
Once you have arranged your custom menu items to your heart’s content, click on the “Save Menu” button. (I don’t really need to show you a screen shot of that, do I?)
Putting Your Custom Menu Someplace
Ages ago, I mentioned that “Theme Locations” thing and told you to ignore it, because we would eventually get back to it. That time has come.
If your theme supports Custom Menus, it will give you a place to put them. By clicking on the “Theme Locations” box, you can find out where your theme will allow you to put them.
The theme I use, Graphene, supports three separate locations:
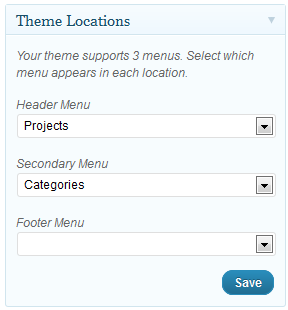
If you look at the top of this blog, you can see that in the header menu, I have included the custom menu I call “Projects”. In the Custom Menu pane, it looks like this:
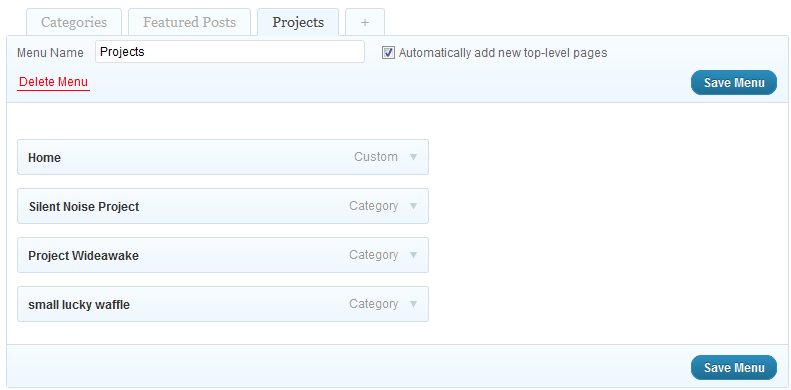
This category is just for my podcasting projects, each of which is assigned to its own category. (Actually, I have a category called “Podcasts” and then each separate podcast project has its own category, with “Podcasts” as its parent.) It looks like this:
![]()
In the secondary menu, I have included the custom menu I call “Categories” which I’ve already shown you up above. It looks like this:
![]()
Even though my theme supports it, I haven’t yet created a Custom Menu to include in the footer.
Where Else Can You Use a Custom Menu?
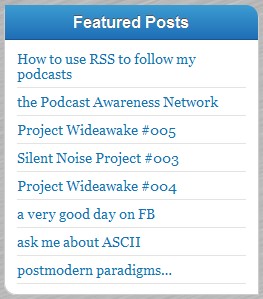
If you look through the above screen captures closely, you’ll notice that I have a third custom menu that I haven’t mentioned yet, called “Featured Posts”. It contains posts that I want to draw readers’ attention to. Even though my theme would allow me to put it in the footer, I don’t think many people would notice it there. I want it in the sidebar. This is easy to do.
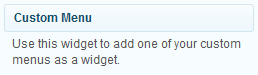
First, go to “Widgets” in the “Appearance” tab.
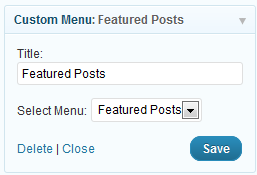
In the “Available Widgets” side of the Widgets pane, find the widget labeled “Custom Menu” and drag it to wherever you would like it on whichever sidebar you want it to appear. It looks like this:
Once you’ve dragged it to the sidebar, click on the arrow on the right side to access its options. Pick a custom menu, give it a title, and then click the “Save” button. Mine looks like this in the widget pane:
and like this on my actual blog:
I can do this wherever I can stick a widget, and I can use custom CSS to style that widget, and the Custom Menu it contains, however I wish. That, however, is the subject of another post.
There is a lot about custom menus that I have left off. This post is only meant to get you started. You can always visit this page on the WordPress Codex for more information. As always, feel free to comment with questions or comments.
*Well, maybe not all. It depends on your theme and WordPress.
https://techblog.kjodle.net/2011/08/25/create-custom-menus-in-wordpress/

I’d love to see a really broad view tutorial or set of tutorials which let you get a basic understanding of the basic paths to take. If you are relatively new to wordpress and to the concept of themes…it’s realllly time consuming and frustrating to figure out where to start, which kind of theme to use, which options matter and which don’t for what you’re trying to do. Like, I ended up using and Elegant Theme “Envisioned” for my portfolio site but OMG it took me two weeks to sort that out, and I’m a web designer by profession. But I hadn’t had much WP experience. So it seems to me that some “how to know what you need” and “if you use x theme start here and do these 20 steps” with FAQs for the common stuff you see asked.
Also a massive FAQ list would be great. It sure seems like the same issues get asked all the time…”how do I do x or y or z?”
A tutorial of “common modifications” would be nice, with simple step by step how tos.
And in that broad view theory, for example, I had no idea I should have started with a child theme. Now i have to back up and redo a bunch of stuff. Sure I could have ready the wordpress tutorial on child themes, but I didn’t know i needed to even read it until it was too late.
I could see a fun map kind of thing..”You are here”.
What kind of site do you want?
> EBiz, Portfolio, Blog etc. with branches going from each with a few popular sample themes from each and why they are popular.
I just chose blind both times having no idea what I was really choosing between.
For my portfolio site I was horrified to realize how hard it is to make good galleries in the theme (Envisioned/Elegant Themes). I’m used to things like Jalbum where you easily populate a gallery with tons of photos. This whole post one photo at a time as a post then dress it up to pretend its not a post is totally counterintuitive to me. So…something from a broad view to give you the lay of the land before you choose a theme or even decide if the WP path is the right path would be really helpful.
I know that’s all asking for a lot…that’s just my two cents after now spending about a month getting three sites figured out, using two different themes, and still not knowing if i made quite the right choices for what I wanted to accomplish.
Also, as I mentioned…I think a basic tutorial on explaining what’s WP stuff vs what’s theme stuff would be very helpful.
Thanks for all your help and energy in the Graphene forum…it’s really very much appreciated!
Laura, you raise a lot of excellent points about learning to use WordPress. I especially like your idea of a map to show people which way to go. Hmmm….will have to keep a notebook with me all the time to sketch this out.
I used to use a different theme before I selected Graphene, so I was more aware (without even realizing it) of what was a WP issue and what was a theme issue. But you’re right; if you are a complete noob, it can be hard to figure out which is which. I’ll be trying to come up with some outlines of future posts along these lines, so check back and let me know if I’m coming up with useful stuff.
Well, my “common modifications” might not be your “common modifications.” What did you have in mind?
I use Piwigo for this–both the gallery and the WP plugin. You can see my gallery here, and a post using that Piwigo plugin here. Very nice, but still not exactly what I’m looking for. Nothing ever is.
Jak stworzyć menu rozwijane?
Jeśli temat obsługuje rozwijane menu i niestandardowych menu, tworząc własne menu w ten sposób automatycznie utworzyć menu rozwijane.
Ken
i have try to create category menu, but no image,, any help????
I’m not quite sure what you mean here. Please provide more details.