Moodle is a powerful CMS (course management system), because it allows a high degree of interactivity, both between students enrolled in a course and between students and the course itself. Interactivity between students occurs largely in the Forum, Database, Wiki, and Glossary modules, whereas interactivity between students and the course occurs in the Lesson module.
Despite this, many of the Moodle courses I’ve seen don’t take advantage of these capabilities. I won’t get into the reasons for that here (that’s the subject of another post), but one reason few people take advantage of the Lesson module is because it is not an easy one to understand. It is in many ways counter-intuitive, with labyrinthine options that are difficult to figure out.
Nevertheless, I knew that if I wanted to make the most of Moodle, I would need to master the Lesson module. Whenever faced with learning something daunting, especially with regard to software, I follow a couple of rules: first, focus on only one or two aspects of the software at a time, and second, practice with something you are already familiar with.
Moodle’s Lesson module has four components: PowerPoint presentations, clusters, branch tables, and question pages. I decided to focus just on branch tables and question pages. To make things simple, I decided to create a lesson about something everybody knows how to do: changing a light bulb.
Contents
The Flow Chart
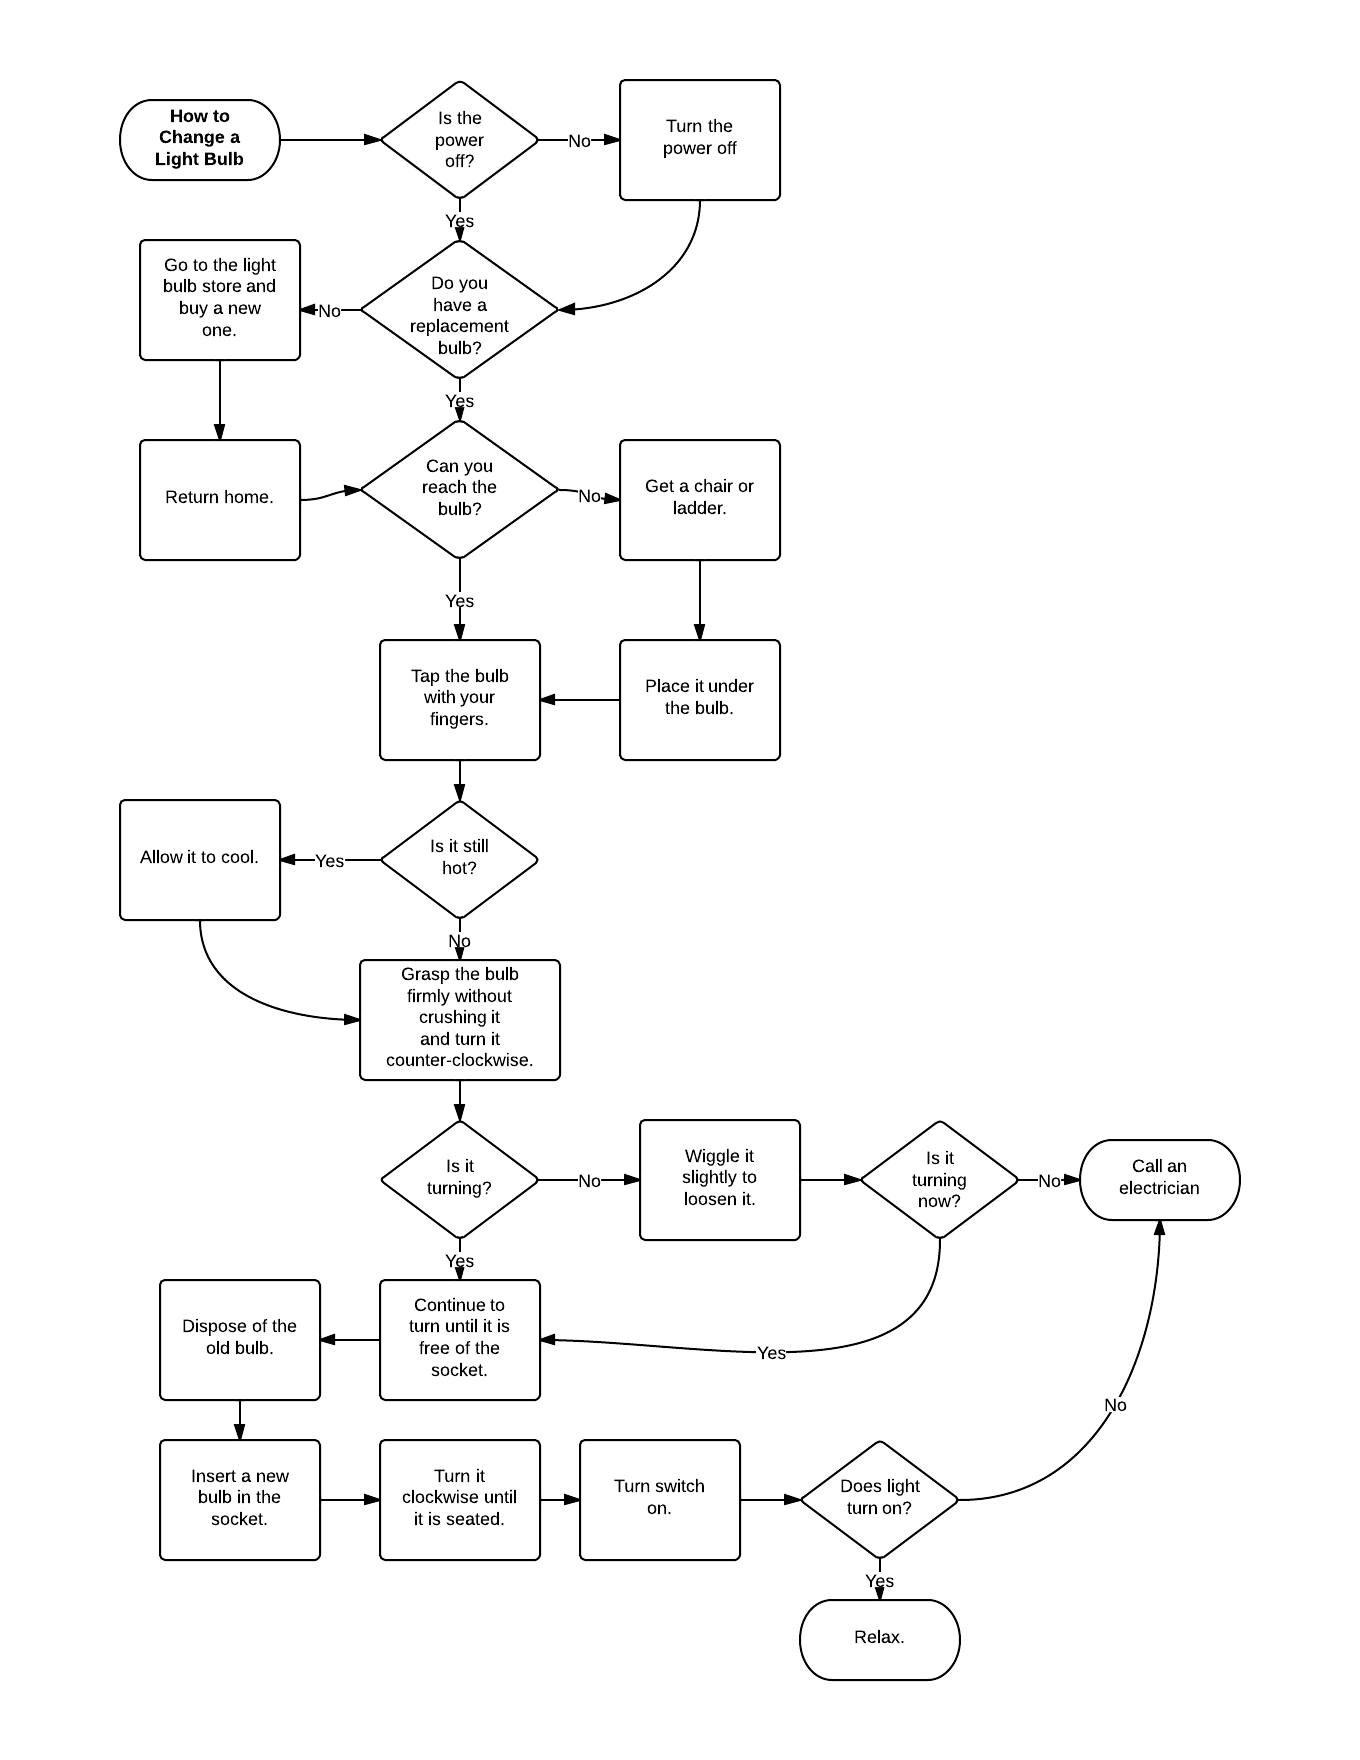
Google “moodle lesson module tutorial” and most of the results advise you to map out your lesson in the form of a flow chart. So I headed over to Lucidchart to create a flow chart for changing a light bulb. As it turns out, changing a light bulb turns out to be more complicated that I originally envisioned. You can see the results here:
Since flow charts are probably unfamiliar to anyone who’s never seen an IBM punch card, a brief explanation is in order:
- Rounded rectangles represent the beginning or end of a process.
- Diamonds represent questions with yes/no answers.
- Rectangles represent actions to be taken.
Changing a light bulb is ordinarily a linear process: step one, step two, step three. What makes it complicated is when something unexpected happens, and you are faced with a multitude of possible responses. My flow chart only has yes/no responses because computers can only handle yes/no questions, although I could have added other options—Moodle’s Lesson module could handle them with ease. But I did want to keep this as simple as possible. As a result, there are a couple of points in the flow chart where something goes wrong and I simply throw up my hands and say “call an electrician.’
As a result, this flow chart doesn’t represent a real-life situation as accurately as it could. If I included all the potential troubleshooting situations one might run into, it would be the size of a tabletop, at least. This has an impact on any Moodle Lesson you design, because you need to answer two questions before you start your lesson:
- How much does this have to look like real life? (I.e., are we imitating or modeling?)
- How much time and energy do I have to devote this?
From Flow Chart to Moodle Lesson
As I said earlier, I decided to use only branch tables and question pages in this sample lesson. I could have done the entire lesson with one or the other. Why use both?
First, both branch tables and question pages allow users to make choices. Branch tables, however, do not judge as to whether those choices are correct or not, and do not award a grade for them. Second, questions pages don’t actually need to ask a question: if you don’t specify a correct answer, it provides a simple “Continue” button at the bottom of the page, which provides for a more linear flow of information for students.
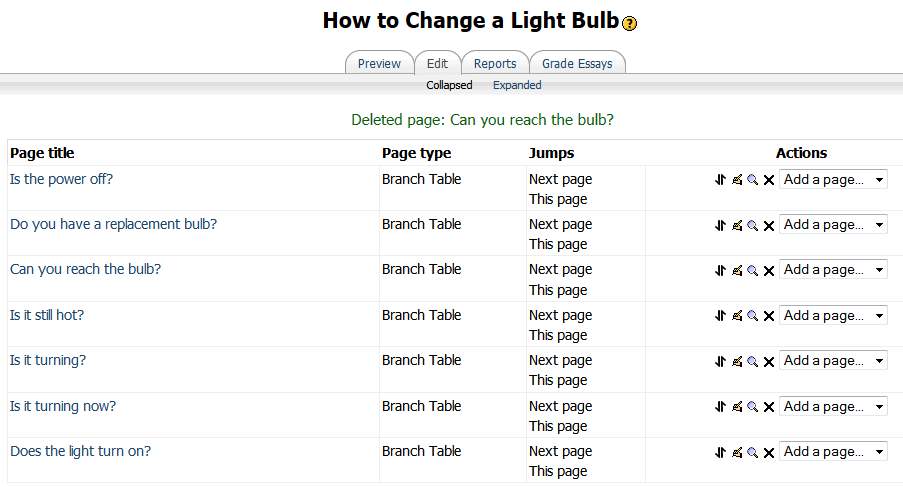
Looking at my flow chart, it was clear that diamonds needed to be branch tables and rectangles needed to be question pages. So I entered all my diamonds as branch tables first:
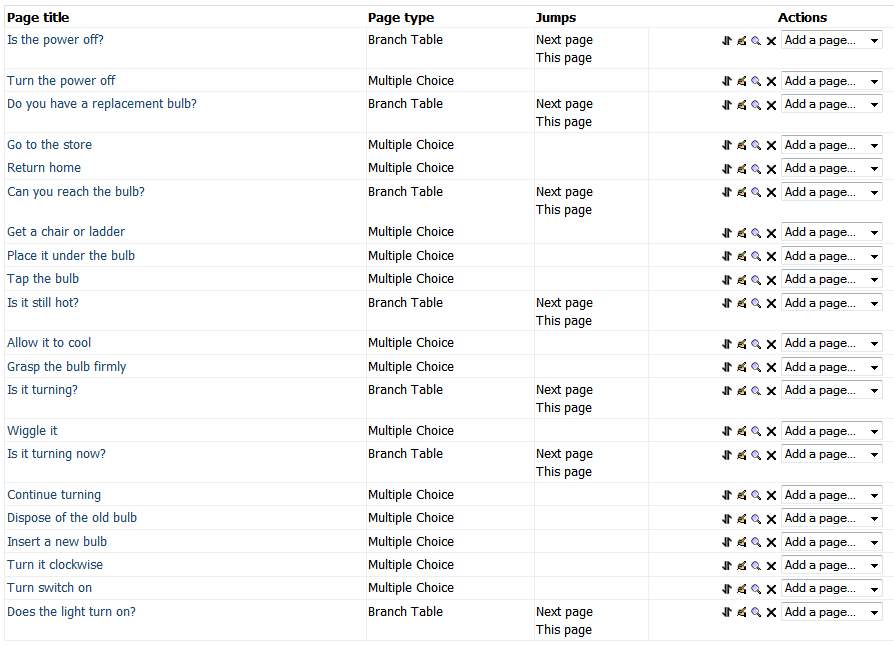
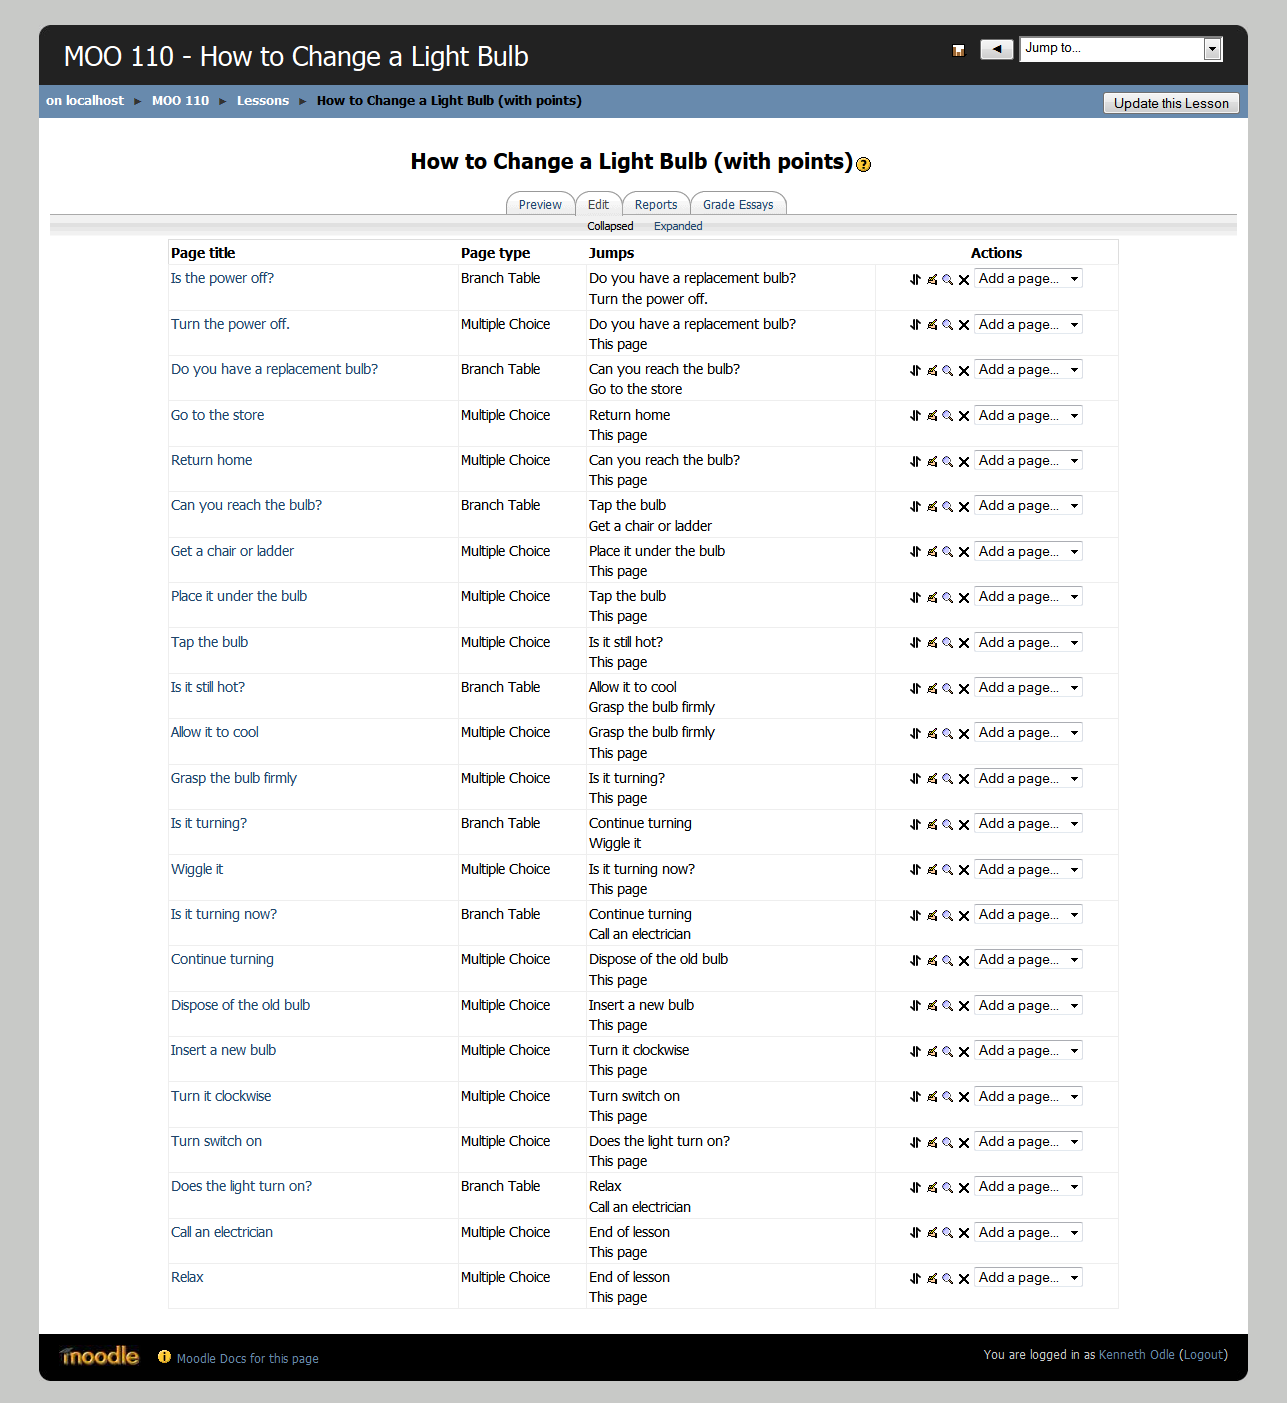
This is where the Lesson module becomes a bit counter-intuitive. When you create a branch table, each choice links either to the next page in the flow of the lesson (which is the next one in the list that you see above), or back to the same page. In order to make these branch tables function the way the diamonds in my flow chart do, I have to create the pages that come after them and then go back and change the links in the branch table. (There is an alternate way to do this that I’ll describe later, but since this is the way most people first create a lesson, we’ll stick with this method for now.)
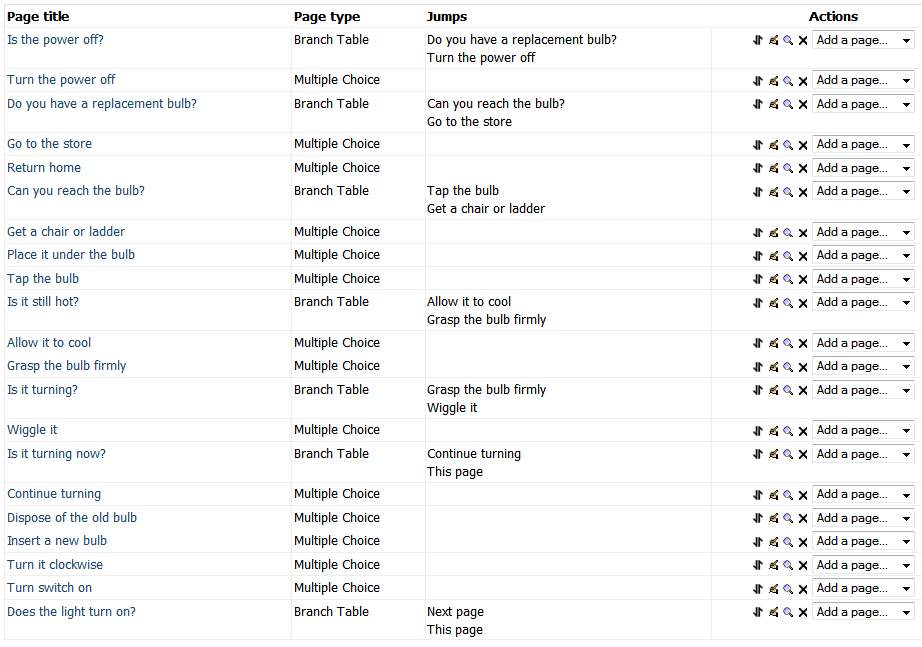
Notice that each branch table still links to the next page in the normal lesson flow. I went back and edited the branch table links so the choices (the first is “yes” and the second is “no”) reflect the page I want learners to be directed to:
By going through this list and answering “yes” or “no” to each branch table, and then following the appropriate link, you can verify that this pretty much follows my flow chart. (There is actually a mistake in the above image which I went back to fix.)
I also need to add two question pages to end the lesson: one instructing students to call an electrician and one telling them to relax. Those question pages will then link to an end of lesson page.
Everything is now complete. You can test drive this Lesson module yourself at kjodle.info/moo110. Login as a guest. When you are asked for the enrolment* key, enter “MOO110”.
*Yes, that’s the correct spelling. Moodle was developed in Australia.
More Cowbell!
Even though this lesson doesn’t award any points, it’s a fairly simple matter to edit each question page to award points. I created a second version of the lesson that does this. It was a simple matter of adding an actual question to each question page that asked “Did you do this?” If the student answers “Yes” they earn a point and are directed to the next page in the flow. If they answer “No” they don’t earn a point and are directed back to the same question page.
You can see what those pages look like here:
This version of the lesson is contained in the same course as the earlier version.
Working Backward
I said earlier that the Lesson module is difficult to use because you have to create links to pages that don’t yet exist. It is possible, however, to work backward to make this easier.
First, create the first and last pages in your flowchart. Then, click on the “Add a page…” link in the first page, but instead of adding the second page in your flowchart, create the next to the last page. Then, click on the “Add a page…” link in the first page, and add the second to the last page. Working backward like this means that you will be able to create pages that link to pages that already exist.
This method is not foolproof; there will still be some pages whose links you need to edit. But this method will save you a lot of time.
A Caveat
As with any Moodle module, it’s a good idea to run through it using student privileges. I recommend creating a special student account (“Joe Student”) just for such purposes.
https://techblog.kjodle.net/2012/12/30/how-to-change-a-light-bulb-using-moodles-lesson-module/



This post is exactly what I was looking for! I’m the Moodle trainer for my school district, and there has been a lot of discussion about Lessons and how to develop them in Moodle. You have helped me immensely – thank you for sharing your outstanding tutorials!
I’m glad you found it useful. I didn’t find many tutorials that were intuitive, since you essentially have to build a lesson backward.
Looks great, but example lesson link does not work 🙁
Very disappointing since this looks like a great training lesson….
Sorry about that.
The course has been restored and moved to a newer, more robust Moodle server. Just follow the link above, enter the course as a guest, and use “MOO100” as a password.
Hi, Can I use your flowchart “How to Change a Light bulb” to illustrate a flowchart? I’m writing a textbook in English and my topic is creating a flowchart. Your flowchart is simple and practical.
Thank you.
Loida Dumaguin
Philippines
Certainly.