This is a very basic introduction to the HTML language. The intended audience is people who know absolutely nothing about HTML. The purpose of this article is not to teach you how to write HMTL to create a web page, but to explain those items you see when you view the source code of a web page, so that when you see this:
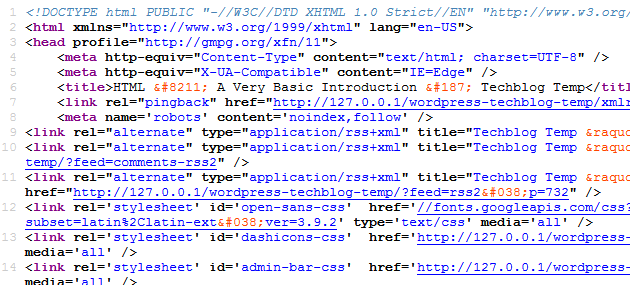
you’ll be able to identify the most important elements and what they do.
Contents
Basics
HTML stands for “Hypertext Markup Language.” Hypertext refers to text that is hyperlinked—you can click on it to go other places. (Yawn—I know, right? But in the early days of the internet, this was a very big deal.)
In this tutorial, I will use the word “document” to refer any file ending with either “.htm” or “.html” extensions, and can be viewed in a web browser as a web page. I will use the word “audience” to refer to anyone reading these documents in a web browser.
Editing Code vs. Viewing Pages
You can create an HTML document in any text editor, which is the preferred method. If you open any HTML document in a text editor, you will (generally) always see the source code, rather than the way the page will be displayed by a web browser, such as Firefox.
You can also use a word processor, provided that you save the document as an HTML document with either a “.htm” or “.html” extension. Some word processors, such as MS Word, can also view HTML documents and display them as a web browser would. You should, however, avoid using a word processor to create web pages. Stick with a plain text editor instead. (Notepad++ is a good one for Windows.)
Elements and Tags
HTML consists of elements. An element consists of an opening tag (which is contained between angle brackets: < and >), the text that readers see, and a closing tag (which includes a slash just inside the first angle bracket). All elements have opening and closing tags, although closing tags are not always used with some of them.
A common HTML element is the paragraph, which begins with an opening paragraph tag (`<P>`) and ends with a closing paragraph tag (`</P>`). In practice, it would look like this in a text editor:
<P>Lorem ipsum dolor sit amet, consectetur adipiscing elit. Ut metus ante, euismod sed. </P>
Which looks just like this:
Lorem ipsum dolor sit amet, consectetur adipiscing elit. Ut metus ante, euismod sed.
Case Doesn’t Matter
Is there a difference between `<p>` and `<P>`? No, you can use either. To a browser, they are identical.
If you are coding by hand, using `<P>` rather than `<p>` requires you to use two extra keystrokes. For longer tags, you would either have to use the caps lock key or use the shift key a lot. Typing tags in upper case does make them easier to see on the page, however, and for that reason I will use <P>, rather than <p>, in this tutorial. For the purpose of this tutorial, typing them in uppercase is easier than formatting them as bold (<p>), which involves extra mouse clicks on my end, and is also better than rendering them as code (`<p>`), which involves a lot of keystrokes on my end and can make them more difficult to read on the screen.
Just remember that you can type whatever you prefer.
Styling
In the old days, before CSS (Cascading Style Sheets, that is) was widely adopted, styling information was included with each and every HTML element. That method worked, but if you suddenly decided that you wanted to change the appearance of every single paragraph on your website, you literally had to make hundreds, if not thousands, of revisions.
Now, a separate style sheet is used to style all elements across an entire web site, and styling is no longer a part of HTML markup. While it is still possible to style HTML documents without using CSS, I am not going to show you how to do that here. I will write another tutorial about CSS later.
Structure of an HTML Document
There are four elements that every HTML document needs to have:
- <!DOCTYPE>
- <HTML></HTML>
- <HEAD></HEAD>
- <BODY></BODY>
<!DOCTYPE>
This is not quite an element, but every HTML document should have one, right at the very beginning. Basically, <!DOCTYPE> tells browsers what kind of HTML your document contains. This is really a more advanced topic, but I mention it here for four reasons:
- Every HTML document should have one. (So form the habit of including one right from the beginning.)
- You will encounter them if you look at other HTML documents
- If you are coding by hand, you will need to make sure to include them. (If, on the other hand, you are using a blogging platform like WordPress or a CMS platform like Drupal, they are generally included automatically.)
- They are the only element that should exist outside of the <HTML> element.
<HTML></HTML>
This element includes all of your page, except for the <!DOCTYPE> declaration. <HTML> is the second tag on an HTML document. It tells a browser that everything that follows it is HTML. The </HTML> tag is the last item in an HTML document.
<HEAD></HEAD>
These tags define the HEAD element of an HTML document. Three important things you will find here are:
- <TITLE></TITLE> tags that define the title of the page, visible in the header bar of the window. This is generally the only item in the HEAD which is visible to the audience.
- Links to CSS style sheets that define the appearance the the HTML document.
- Scripts (usually written in Javascript) that provide additional functions for the document.
There are other things there, of course, but these are the only ones you really need to know about for now. I’m not going to talk too much more about the elements you will find in the HEAD—that’s the subject of another, more advanced post.
<BODY></BODY>
These tags define the body of an HTML document. Content that the audience can see goes between these two tags. Most of the rest of this document is concerned with elements found inside the BODY of an HTML document.
HEAD vs. “header”
Don’t confuse the `<HEAD>` of a document with the header of a document. While every HTML document has to have a `<HEAD>`, it doesn’t have to have a header, which a lot of platforms (including WordPress) use to designate a set of information (typically a header image and navigation options) that occurs at the top of every page. Pages with a header often have a corresponding footer at the bottom of every page that contains additional information (such as copyright information).
(You may also have heard of HTTP headers, which are another completely different entity.)
Structural Elements
These will form the basic skeleton of your HTML document.
Paragraphs
As noted previously, these are enclosed between paragraph tags: <P> and </P>. Unless otherwise styled by CSS, these are typically displayed as a chunk of text left-aligned, with no indent, and with space above, setting them apart from the previous element. These are building blocks of any HTML document.
Headings
A heading is like a headline: it introduces the text that follows it. As in a newspaper or magazine, the main headline is the biggest one and encompasses the entire article. Smaller headings encompass smaller portions of the article, and may include even smaller headings.
HTML has six levels of headings, described by the tags <H1>, <H2>, <H3>, <H4>, <H5>, and <H6>, along with their corresponding closing tags. <H1> is the largest (and most inclusive) heading; <H6> is the smallest (and most restrictive) heading.
Well-designed websites should always start with<H1> and work down from there. In other words, <H1> should always be followed either by <H1> (designating a topic of equal importance to the first) or by <H2> (designating a subtopic of the initial topic).
If this looks a lot like the outlines you learned to create in high school, you’re right:
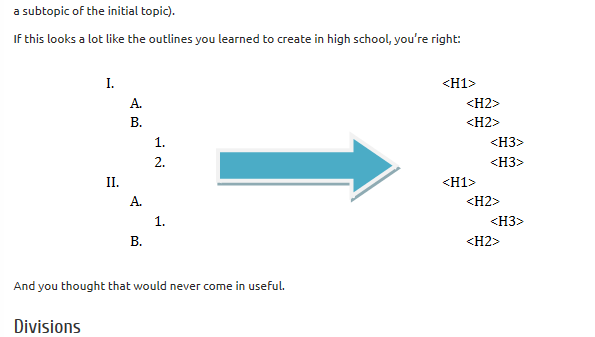
And you thought that would never come in useful.
Divisions
Divisions are marked by <DIV> tags. Technically, they are “block-level elements,” meaning they can stand apart from the rest of the content on a page. If you can imagine an invisible rectangle around a portion of a webpage that separates it from the rest of the content on that page, it probably belongs in a <DIV> element. Likewise, if you look at a webpage (such as this one) and see bits of content that are set off from the rest of the content, they probably are in a <DIV> all their own.
Spans
Spans are marked by <SPAN> tags. Unlike divisions, spans are “inline-level elements” meaning that they are intimately connnected to the content that comes before them and after them. For example, if I wanted to change the appearance, such as the color or font-weight, of a word or sentence within a paragraph, I could enclose that bit in a span.
In short, a span is like a brick in a wall: intimately bound to the other bricks that surround it. A division is much more like the wall itself: it can stand at a right angle or an obtuse or acute angle to the walls around it, or it can even stand on its own.
<BLOCKQUOTE>
This element sets text aside as a block, usually indented slightly on the left or both sides, and with space above and below. It is meant to indicate lengthy quotations from other works.
Blockquotes are often styled using CSS to make them stand out even more.
This is an example of how WordPress, Graphene, and the child theme I created for this blog style a blockquote.
<CODE>
This element is used to display actual source code (whether it’s HTML, CSS, PHP, or something else) without the browser actually attempting to render it. This is kind of an advanced topic. Let’s suppose you want to display actual HTML code, like I’m doing in this article. You can’t just enclose it in a paragraph element, because a web browser will parse it—that is, it will render it as whichever element it is.
There are three things to remember about the `<CODE>` tag:
- The `<CODE>` tag is an inline element, so you can use it to include a bit of code within a paragraph.
- Most browsers display the contents of a `<CODE>` tag in a monospace font, although, like the `<BLOCKQUOTE>` tag, this can be further styled with CSS.
Links
Links are what make HTML hypertext. Clicking on a link takes you someplace else.
Anchor Links
Anchor links can link to several different things, including:
- another page
- another location within the current page
- a location in another page
- a mail link
The basic syntax for an anchor link is:
<A HREF="location">what the audience sees</A>
“Location” can refer to any of the items mentioned above. Notice the closing tag. You can include additional, non-linking information after the closing tag.
Linking to Another Page
To link to another page, simply substitute its URL (including the “http://” bit) for “location” in the example, and the site’s title:
<A HREF="http://techblog.kjodle.net">Up Past Midnight</a> This blog rocks!
would appear as:
Up Past Midnight This blog rocks!
Linking to a Location in the Same Page
There are two steps to creating this sort of link. First, you must use an anchor to name another element, usually a heading:
<A NAME="step_two"><H2>Step Two: Monetize Your Pets</H2></A>
You then link to that location using the name, preceded by a “#” symbol:
<A HREF="#step_two">Go to Step Two</A>
This is how menus, such as the ones you see on Wikipedia articles, are created.
Linking to a Location in a Different Page
This works the same way as the previous example, except we also include the URL of the different page in the anchor tag. If the URL of the other page is “http://www.example.com/silly-pet-tricks.htm” and the location is named “step_two,” our link is now:
<A HREF="http://www.example.com/silly-pet-tricks.htm#step_two">Find out how
to monetize your pets</A>
Linking to an E-mail Address
I’m only including this for informational purposes, as you should never do this unless you want more spam than your mail server can handle. If your email address is “me@us.com,” you would use:
<A HREF="MAILTO:me@us.com">Send me Spam!</a>
If you want to automatically include a subject, just add a question mark after your email address and `SUBJECT=`, like this:
<A HREF="MAILTO:me@us.com?SUBJECT=I love spam">Send me Spam!</a>
This type of coding goes back to the good old days before spam and before web-based email, when everybody used an e-mail client to send and receive mail. If you want to relive the glory days (and you still use an email client like Thunderbird or SeaMonkey), go ahead and click the link below:
Image Links
Image links are created using the <IMG> tag, and allow you to include images in your web pages. All you need is the URL of your image:
<IMG SRC="http://www.example.com/images/goat.jpg"></IMG>
You can actually get by without the closing tag, but it makes things neater.
You can also include the “ALT” descriptor, which is what will be displayed if the picture is not available:
<IMG SRC="http://www.example.com/images/goat.jpg" ALT="This is a picture
of a goat"></IMG>
Using the ALT descriptor allows the audience to know what they are missing if the image file is not available.
Using Images as Links
One thing you can do is to use an image, instead of text, as a link. So instead of:
<A HREF="http://www.example.com/goats/gallery.html">See all my goat pictures!</A>
you would use:
<A HREF="http://www.example.com/goats/gallery.html"><IMG SRC="http://www.example.com/
goats/goat_link.jpg" ALT="See all my goat pictures!"></IMG></A>
A note about hotlinking: The `<IMG>` tag makes it possible to use images from someone else’s website on your own. This is called hotlinking and you should never do this. When you hotlink to an image, you are stealing someone else’s intellectual property (since the image looks like it’s your own) as well as their bandwidth.
Some people try to get around this by downloading the image and uploading it to their own server. You aren’t stealing bandwidth, but you are still stealing their image. You are stealing less, but you are still stealing. Theft is theft. Only use images that you have the rights to and that you host on your own server.
Lists
There are three main types of lists:
- Ordered lists (1., 2., 3., etc)
- Unordered lists (each item is usually preceded by a bullet or other symbol)
- Definition lists
Ordered Lists
An ordered list element is contained by the tags <OL> and </OL>. Individual list items are contained by the <LI> and </LI> tags. For example, this HTML:
<OL>
    <LI>The first item.</LI>
    <LI>The second item.</LI>
    <LI>The third item.</LI>
</OL>
will produce this list:
- The first item.
- The second item.
- The third item.
Unordered Lists
Unordered lists are created the same way as ordered lists, except that they use the <UL> and </UL> tags. They are typically displayed with bullets in front of each item. This code:
<UL>
    <LI>The first item.</LI>
    <LI>The second item.</LI>
    <LI>The third item.</LI>
</UL>
will produce this list:
- The first item.
- The second item.
- The third item.
Unordered lists are used in a lot of surprising places, including navigation menus.
Both ordered and unordered lists are often heavily styled using CSS.
Definition Lists
A definition list provides a way to include a glossary or other list of terms on a website. The entire list is enclosed by the tags <DL> and </DL>. Terms are enclosed by the tags <DT> and </DT>, while their definitions are enclosed by the tags <DD> and </DD>.
This code:
<DL>
    <DT>CSS</DT>
    <DT>An abbreviation for Cascading Style Sheets.</DD>
    <DT>HTML</DT>
    <DD>An abbreviation for HyperText Markup Language.</DD>
</DL>
will produce something that looks like this:
CSS
An abbreviation for Cascading Style Sheets.
HTML
An abbreviation for HyperText Markup Language.
Dividers
There are two types of dividers: line breaks and horizontal rules.
Line Breaks
A line break is created using the` <BR>` tag. If it is used in the middle of a line of text, the text after it will start on a new line. If a succession of them are used, they can insert additional space into a paragraph. You should avoid this method. Additional space should be created using CSS.
Horizontal Rules
A horizontal rule is created by using the <HR> tag. It simply draws a horizontal line. It can be styled using CSS.
Special Characters
Special characters (such as characters with accents) can be included in an HTML document by using either of these methods:
- `&#?;` where ? is the ISO 8859-1 code
- `&name;` where “name” is the entity name
Thus, if you wanted to type the letter “e” with an acute accent over it (é), you would enter either `é` or `é`.
All characters have a numeric code, but not all of them have a name. Some common ones are:
Non-breaking space: ` ` or ` `
Copyright symbol: `©` or `©`
Cent sign: `¢` or `¢`
You can see a complete listing of these numeric codes and entities names here and here.
Comments
Sometimes when writing HTML code, you will want to include comments to remind yourself of things. Comments are enclosed between `<!–` and `–>`. Anything located between those two tags will not display and the audience will not see it.
They will be able to see your comments if they use their browser’s “View Source” function, however.
You must remember to use the closing tag, or everything after the `<!–` will disappear.
XHTML
Okay, now that I said all that about HTML, I should tell you that HTML is a bit passé. What you’re going to see a lot of is XHTML. Think of it as turbo-charged HTML: similar, but with a few key differences:
- Elements must be properly nested.
- Elements must be properly closed. (Which means you will see a lot of things like this: `<p />` and `<br />`
- Tags must be written in lowercase. In other words, `<p />`, not `<P />`.
Curious? Then read this.
HTML5
The latest HTML standard is HTML5, which succeeds both XHTML and HTML4 and although it makes some things less simple, by and large, it greatly simplifies things.
Things I Didn’t Mention
Like I said at the beginning, this is a very basic guide. I left out a lot of stuff that is really more advanced, such as:
- tables
- forms
- frames
- objects
Some other good resources that I use all the time are:
- w3schools.com (Their quick list is especially useful.)
- HTML Dog
If there is interest, I will be happy to write tutorials for anything there is a need for, provided I can find the time. You can let me know by adding a comment to this post.
Thanks for reading. If you found this post useful, feel free to share it with your friends.
https://techblog.kjodle.net/2011/10/31/html-a-very-basic-introduction/
